I'm back in the creative groove. I am always so behind in making seasonally appropriate items, but no longer - look at this - a whole three weeks in advance of the day. I was desperate to use some of the red and white fat quarter fabric that Andrea had sent me and this idea had been in my head for a while (several years actually - I like to let my ideas mature don't you know).
 I thought I might as well take a few pictures along the way so here it is - my no-sew heart tutorial.
BTW - the background is my old cutting board that I don't use for cutting fabric, it is messy and horrible but ideal for a base to cover the table while I glue.
Here's all you need:
- cardboard from a cereal carton or the like
- scraps of batting
- glue gun
- cotton fabric
- ribbon
Draw round a heart template on your cardboard, I used 5 hearts in my garland but you could have as many as you like.
 Step 2
Cut the hearts out of the cardboard
 Step 3
On the coloured side of the card, use your glue gun to put 3 dots of glue on the heart shape (one near the point and the other 2 either side of the 'V', if you see what I mean). There is no need to spread the glue all over the card, this is just to hold the batting in place so that it doesn't move around so three dots are all you need.
 Step 4
Plonk the card glue side down on a scrap of batting - I used what I had around - you want it to be a fairly high loft to give the heart some shape.
 Step 5
 Step 6
 Step 5
Cut the batting level with the edge of the card.
 Step 6
Cut your fabric about 1/2 inch bigger than the heart template (I just drew round the template I used for the card and cut the fabric a bit bigger by eye, but you could make another template just for the fabric)
 Step 7
 Step 7
Position the card, batting side down on the wrong side of the fabric, making sure that it is placed in the middle of the fabric.
 Step 8
 Step 8
 Holding all the layers together, turn it over and pin the fabric to the batting.
 Step 9
 ... and the front of it should look like this.
 Step 10
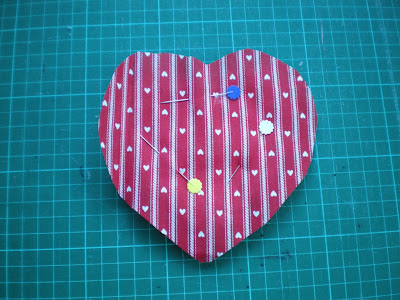
 Step 9
Pull the fabric over to the back of the heart and glue it down all around the edge with the glue gun. I made sure that I stuck down the top and the bottom of the heart first, because you have to pull the fabric quite firmly and that way it doesn't shift around too much. The back of the heart should then look like this ...
 ... and the front of it should look like this.
 Step 10
 Take a piece of ribbon long enough to go through all of your hearts with excess at the ends to hang your garland from. Glue the ribbon to the hearts with a dot of glue at each side of the heart, leaving about an inch of ribbon between the hearts.
 Step 11

Step 11Use your heart template again to cut more heart shapes, this time out of pelmet vilene - you need to cut a smidgeon within the line you have drawn so that you can't see it from the front of the heart. Because I am a lazy good for nothing woman, all I did then was to glue the pelmet vilene onto the back of the hearts - after all, no one's going to see them, they're against the wall. But ... you could do it in a couple of different ways, depending on your inclinations. You could either use the same fabric as the front to sew a heart shape to the back, turning in the edges as in applique, or, you could use heat'n'bond to fuse fabric to the back of the heart.
 After you have done this, your garland is ready to hang and will look something like this.
 After you have done this, your garland is ready to hang and will look something like this.
Which looks okay - but we all know that more is more and I think the addition of some ribbon bows does add a little je ne sais qu'a (or even je ne sais quoi - who would believe that I've got A-Level French?)

And there you have it - a very quick and easy Valentines Garland

And there you have it - a very quick and easy Valentines Garland